Are you a Shopify store owner looking for an advanced solution to import and export products? In this article, we’ll introduce you to the StoreRobo Product Import Export app and show you how it can simplify your product management tasks in Shopify.
The default importer and exporter tool within Shopify has some limitations. You don’t have many options or filters when migrating product data. That’s why a third-party app like StoreRobo can be really useful.
Let’s get started.
How to Import and Export Products in Shopify? Step-By-Step Guide
Before you begin, make sure you have installed and activated the StoreRobo Product Import Export App on your Shopify website. StoreRobo is available in both free and paid versions; you can choose a plan as per your requirements.
In this article, we will be using the PRO version of the StoreRobo app. So, you may not see all the options and configurations in the lower plans. However, you can do basic import and export actions in all the plans.
Firstly, let’s see how to export products in Shopify.
Exporting Products From Shopify
After installing the StoreRobo Product Import Export App, follow these steps to export products from Shopify.
Step 1: Choose an Export Template
- Log in to your Shopify admin account.
- Go to the Home page of the StoreRobo app.
- Below the Export Products section, choose Shopify CSV as the export template.

- Click on Proceed to continue.
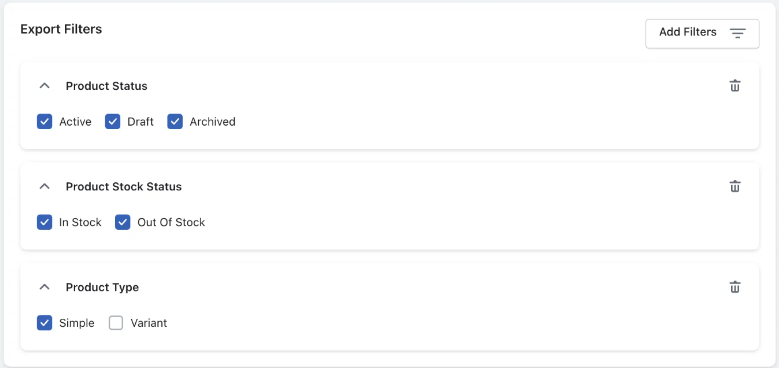
Step 2: Choose Filters for Exporting Products
Choose as per your requirement for the export action.
Here are the available filters:
Product Status: Filter products based on their published status. (Active, Draft, and Archived)
Product Stock Status: Choose products based on their stock status. (In stock and Out Of Stock)
Product Type: Choose products based on their product type. (Simple and Variant)
Step 3: Select the Columns You Want to Export
- Now, choose the product data column fields you want to export. Use the checkbox to select or deselect the column fields.
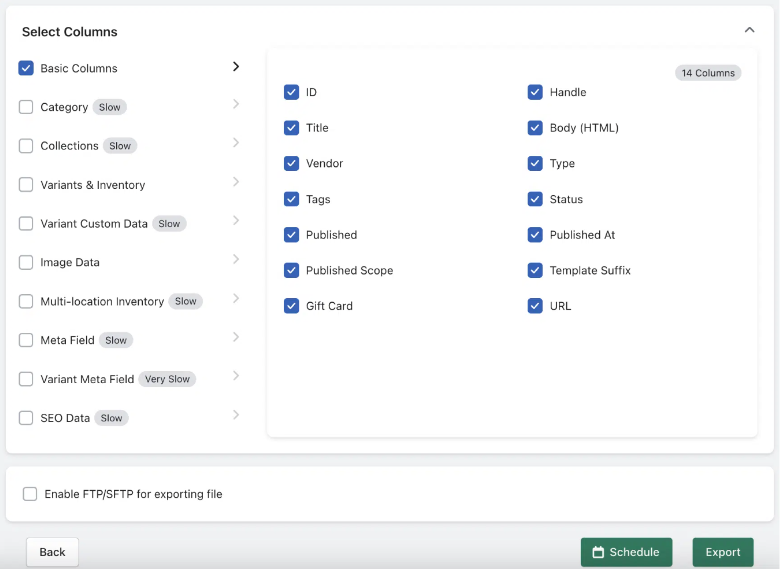
After selecting the necessary columns, you have three options for exporting product data.
- You can connect with an FTP account to export products to an external server.
- You can schedule the export action for a later time.
- You can directly export products from here.
Let’s look at each option.
Step 4: Enable FTP/SFTP for Exporting Products (Optional)
- Enable the Enable FTP for exporting file checkbox. Then, click on the Add profile button to add a new FTP profile.

- Enter the details of the FTP account and click on Connect & Save to save the FTP details.
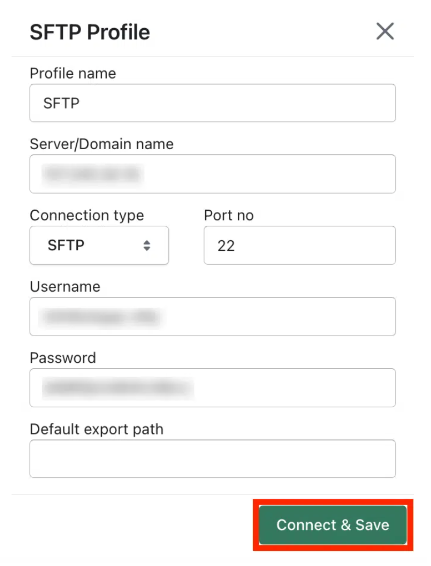
- Similarly, you can add multiple FTP profiles.

- Choose the FTP profile to export the product data file.
Step 5: Schedule Exporting Products (Optional)
- Click on the Schedule button.
- Then, choose the date and time to schedule the export action.
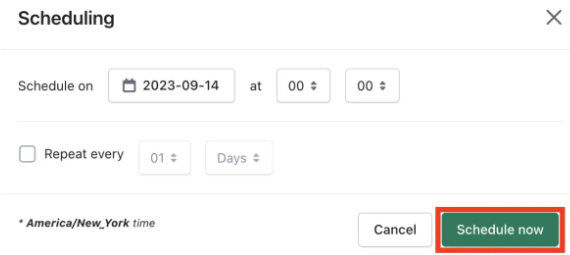
- Click on the Schedule now button to schedule the export.
Step 6: Click on Export
- Click on the Export button to directly export the product data.

- Once the export action is complete, you will see the export job log report. Click on the Download File button to download the exported product data.
Importing products to Shopify
Now, let’s see how to import products to Shopify using the StoreRobo app.
With StoreRobo, you can import products to Shopify using 4 methods.
- Import a CSV file from your local storage
- Import a CSV file from a public URL
- Import a CSV file from an external server using FTP
- Directly import products from WooCommerce using WooCommerce API
Importing Products from Local Storage
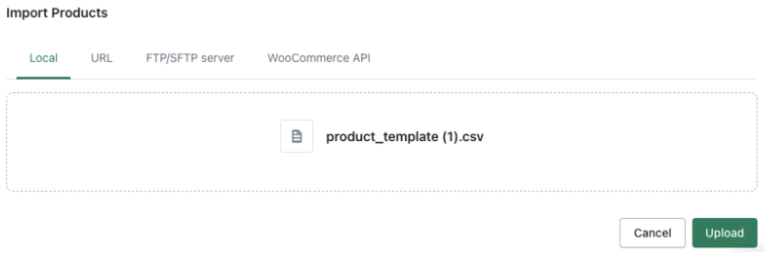
- Under the Import Products section, select the Local tab.
- Upload the CSV file containing the product data from your local storage.
- Click on Upload.
Importing Products from a Public URL
- Select the URL tab from the Import Products section.
- Enter the URL to the CSV file uploaded publicly. You can use any public URL, such as Google Sheets.
- Select the template of the CSV file.

- Click on Proceed.
Import Products from an External Server
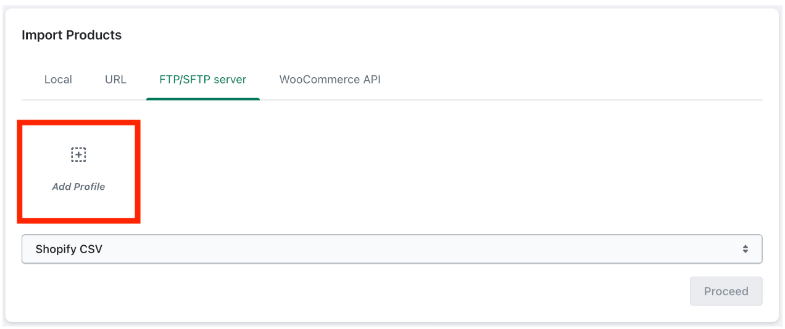
- Select the FTP/SFTP server tab.
- Click on the Add Profile button to add an FTP account.
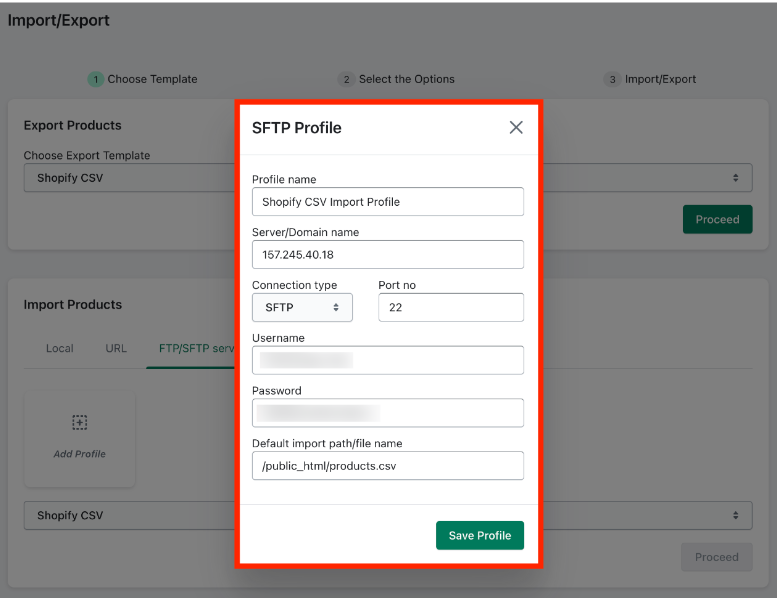
- Enter the FTP profile details and click on Save Profile.
- Similarly, you can add multiple FTP profiles to import products.
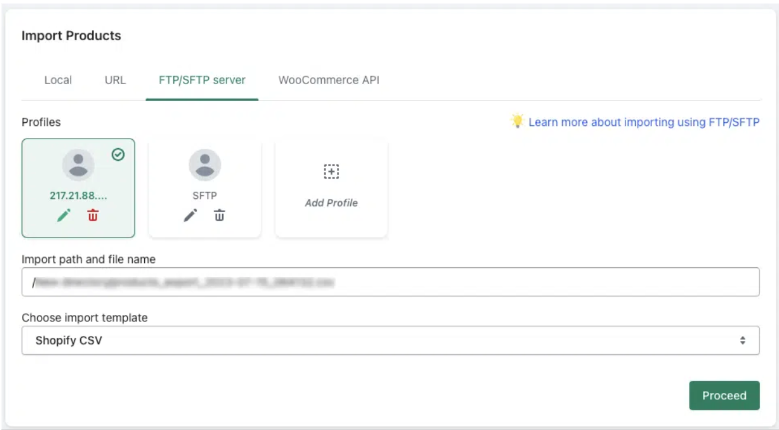
- Select the profile from which you want to import the products.
- Choose a template for the import file.
- Then, click on Proceed to continue.
Import Products using WooCommerce API
To directly import products from WooCommerce using the WooCommerce API, first, you need to obtain the API keys from WooCommerce.
- Log in to your WordPress dashboard.
- Go to WooCommerce > Settings.
- Click on the Advanced tab and select REST API.
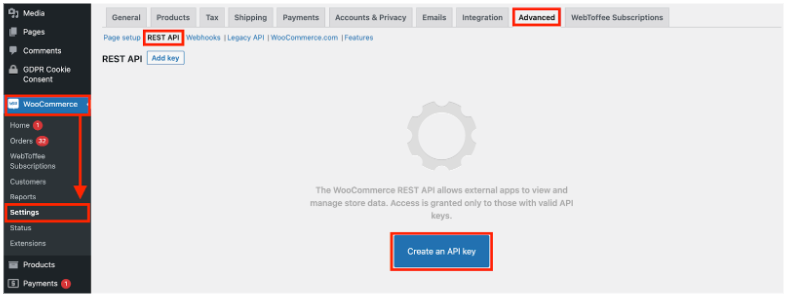
- Click on the Create an API key button to create new API keys.
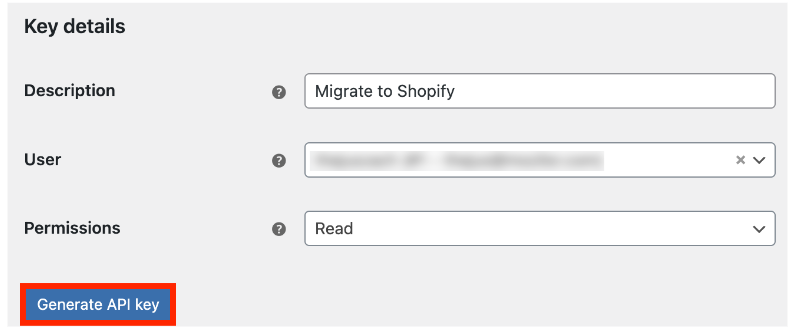
- Enter a description for the API keys.
- Select the permission as Read.
- Then click on the Generate API key button.
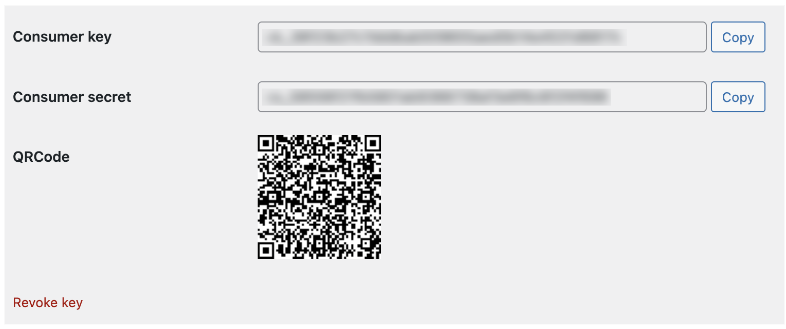
- Copy the Consumer key and Consumer secret.
- Now, go back to the StoreRobo Home page.
- Select WooCommerce API under the Import Products section.
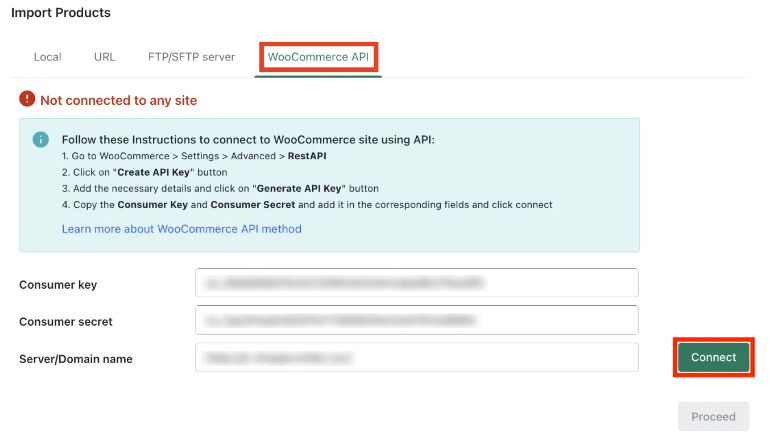
- Paste the API keys and enter the domain name.
- Click on Connect to connect the WooCommerce API with StoreRobo.
- Once the connection is successfully established, click Proceed to continue.
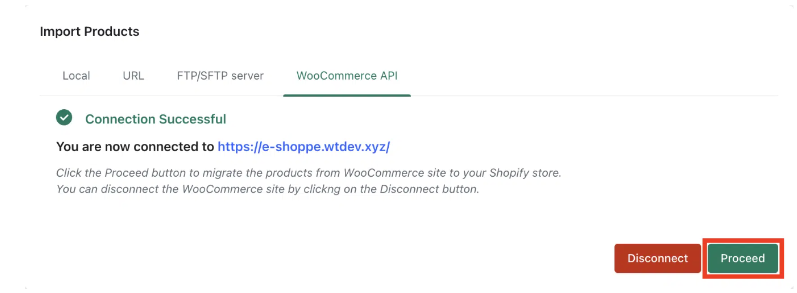
The following steps will be similar for all four import methods.
Choose Filters and Import Options
Here, you have some filters and options to import products.
- Choose a product status for importing products.
- Then, select a stock status.
- Now, scroll down to the Options section.
- Choose whether you want to update existing products using the CSV file.
- Uncheck the Skip import of new products checkbox.
- Enable the Publish new product checkbox.
Now, you can either schedule the import for a later time or import directly.
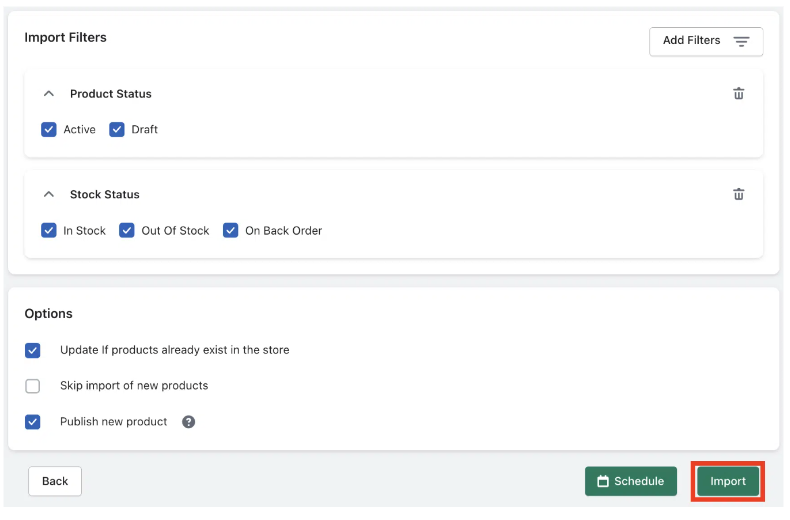
- Click on the Import button to import products directly to Shopify.
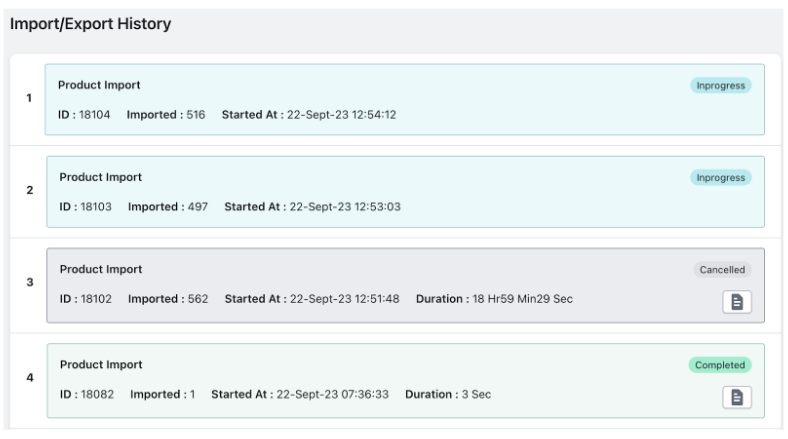
Once the import job is completed, you will see the completed status log report.

Similarly, you can see the status and log report of all the import and export actions on your store from the Log History page.
Now that we’ve covered how to import and export products in Shopify using the StoreRobo app let’s take a brief look at what the StoreRobo app offers.
An Overview of the StoreRobo Product Import Export App
The StoreRobo product import export app is the ultimate tool for importing and exporting Shopify products. It allows you to migrate products within the Shopify store or from WooCommerce to Shopify.
You can import or export products to an external server using FTP/SFTP. The app allows you to migrate products directly from WooCommerce to Shopify using the WooCommerce API.
If you’re busy and need to schedule product import and export actions for a later time, the app has you covered. It operates quietly in the background, allowing you to focus on other tasks while it completes the job as scheduled.
You can upload any customized CSV files, and the app helps you map the CSV column fields to match with the corresponding fields in Shopify, ensuring a smooth and accurate transfer of product data.
Key features:
- Multiple methods for importing and exporting products
- Export products with images and metadata
- Schedule import and export actions
- Upload custom CSV File to import products
- Multiple filters when importing and exporting products
Pricing:
The StoreRobo Product Import Export App has both free and paid versions. The paid version starts at $10 per month.
Conclusion
Importing or exporting product data is a common requirement for many eCommerce store owners. It helps store owners migrate products from one store to another, update existing products, or keep a backup of product data.
The StoreRobo product migrator tool we mentioned in this article will give you more options when importing or exporting products from your store than the default import or export tool in Shopify. It has both free and paid versions. You can choose a plan that meets your requirements.
Do you have any questions regarding product import or export in Shopify? Let us know in the comments. We would be happy to help you.


Recent Comments